
Teams Overview
A Team is a collaborative workspace in Office 365 where you can schedule and hold meetings, store files that can be worked on by multiple team members, record notes, hold conversations or just send a quick message using the chat feature. Teams can be used as your department’s main communication and file storage hub or for temporary or long term projects or committees that need their own collaborative space. Simply-stated, Teams is like an all-in-one replacement for SharePoint and Skype for Business that leverages multiple Office 365 applications from one place.
Create a new Team
To create a new Teams site, either sign into Office 365 online and choose the Teams app, or download and install the desktop Teams app. You might find the desktop program more convenient than having to remember to open a web browser and sign into Office 365 online every day. With the Teams desktop app, you just need to open it once, just as you would with the Outlook desktop application.
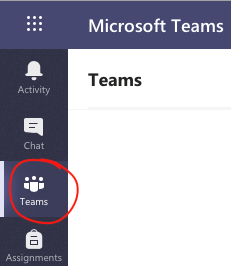
When trying to create a new team, make sure you’re not already inside an existing team site. You can just click on the Teams icon in the left column to get to the main Teams dashboard:
From the main Teams window, click on “Join or create team” and then “Create team”. You’ll be asked to select a “Team type”, although this step isn’t very important, so just select whichever of the four categories most closely represents the type of team you want to create. Give your team a name and a description and then choose whether your team is private (restricted to the people you select), or public (anyone at NSCAD can join it). Now choose your members.
| Note: If you were previously using Groups and already have a department or project site set up, you can convert your Group to a Team, which will add the functionality of Teams without changing the existing group in Outlook, SharePoint or other workloads. See the following page from Microsoft for more information: Create a Team from an existing Group |
Create Channels within your Team
Within your team site, you create individual categories for specific projects or subjects that are relevant to your team members. These sub-sections are called Channels, and these are what really make up your team site, so rather than creating multiple “Teams” for different projects or tasks your department is working on, create Channels within your main team site instead. Even though a channel is part of your main site, it gets its own storage space, conversation history, notes, etc..
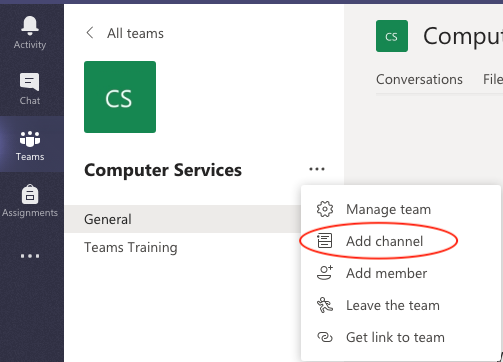
By default, your new site will already have one channel labelled “General”. This is your site’s “home” channel, and as implied by its name, is for any general discussions, notes or files pertaining to your whole team that don’t belong in a specific channel. To create a new channel, start from your General channel and click on the three dots (“more options”) beside your team’s name to get the options menu. Choose Add Channel and then give your new channel a name.